by David Hakala
You may have any reason to change the way Windows XP starts. Perhaps you want to shorten the countdown pause. You might desire to see Recovery Console as an option. You may have added another operating system, such as Linux or Vista, and want to choose which OS to load upon startup. The boot.ini file is the key to making such changes.
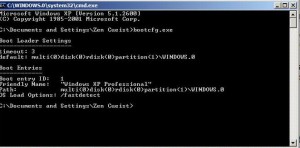
Boot.ini is read by the Windows XP component NTLDR to see which operating system to load and whether a boot menu is displayed upon startup. If there is more than one boot option, a boot menu like this one is displayed:
Be careful not to insert extra characters when editing boot.ini or you computer may not boot at all. If that happens, you will need a System Restore CD and quite a bit of time.
Boot.ini is a hidden, read-only system file so these attributes must be cleared before boot.ini can be edited. Here’s how:
(Note: “Enter…” means “type the following” and then hit the Enter key)
Click Start then Run and Enter cmd
To get to the c:\ directory, Enter cd \
Enter attrib –h –r –s boot.ini
Boot.ini is just a text file so we can use the command-line text editor to make changes:
Enter edit boot.ini
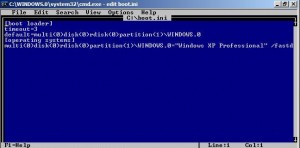
The editor window will look much like this:
The next line specifies the default operating system that will be loaded if no other option is selected. Its parts have the following meanings:
Mult(0)disk(0)rdisk(0)partition(1) means the first partition on physical drive 0, usually logical drive letter C:
\WINDOWS.0 is the directory in which this Windows installation can be found
“Windows XP Professional” is what’s displayed on the boot menu
The /fastdetect switch makes Windows load faster
You can add similar lines for other operating systems installed on your computer and they will be displayed as options on the boot menu.
Let’s add a boot menu entry to make Recovery Console one of the boot menu options. Add this line to the “operating systems” section of boot.ini:
C:\CMDCONS\BOOTSECT.DAT=”Microsoft Windows Recovery Console” /cmdcons
Check your work to make sure there are no typos, blank lines or extraneous characters. Then save boot.ini and exit the editor. Don’t forget to restore boot.ini’s hidden, read-only, and system attributes. Just change “-“ to “+” in the attrib command above.
Your computer should now boot with the changes you have made.
David Hakala has written technology tutorials since 1988, in addition to tech journalism, profitable content, documentation, and marketing collateral. See his LinkedIn profile for details and contact info: http://www.linkedin.com/in/dhakala


{ 2 comments }
Edit the Boot.ini File in Windows XP
The article with the above heading you have given in your site. The method is too lengthy.
Instead this can be achieved by going through the below method
start==> settings==>control panel ==> system==>advanced==>startup & recovery–>settings==>in system startup settings click Edit
The above will open the boot.ini file in write mode.
make the changes accordingly and click on file==>save.
and after all click on ok
and its done.!!
But getting there is half the fun!
Comments on this entry are closed.