by Tina Gasperson
Q: How do you make a password protected zip file? — BPG
It used to be much more difficult to create, extract, and password protect zip files, but since Microsoft integrated file compression and archival abilities into Windows, it’s really just a click or two to get password protected zip files.
To begin, locate a file that you would like to compress and archive by clicking “Start,” “My Computer.” Double click the correct drive letter (usually C:) and navigate to the folder in which the file resides. Once you’ve located it, right click on the file, click “Send To” and then “Compressed (zipped) Folder.” Windows makes the compressed folder right there in the same place as the original file and gives it the same name as the file, except with a .zip extension.
If you have more files to add to the zipped folder, open a new window and drag the files on top of the zipped folder. To change the name of your folder, right click on it and scroll down to “rename,” type the new name, and hit the Enter key.
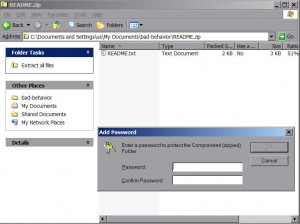
When you’re done adding files, double-click on the zipped folder. A new Explorer window opens and you’ll see all the files you’ve added to the archive. On the menu, click “File,” “Add a Password.” Enter your password, then confirm it, and click “OK.” If you plan to send your zip file to someone via email, make sure you also send them the password.
To remove a password from zipped file, double-click the file so that the Explorer window opens. On the menu, click “File”, “Remove Password.” Enter the correct password, Windows automatically removes the password requirement, and the zipped file folder is now accessible to anyone.
Even if your zipped file is password protected, anyone can see the names of the files included in the archive if they double-click the archive. One way to heighten the privacy of the zipped file contents is to avoid giving the files highly descriptive names. You could simply name them “one,” “two,” “three,” etc. Or, to completely hide the names, create a zip file in the normal fashion, then create a new zip file from the zip file you just made. Password protect this “super” zip file, and then all that’s revealed through a double-click is the name of the first zipped file – and snoopers can’t go any further than that.
Tina Gasperson (tinahdee@gmail.com), affectionately known as Computer Lady by her family, has been writing about IT, home computing, and the Internet for more than a decade.

