by David Hakala
Converting Audio CD music to other file formats and saving them on your computer is called “ripping” the CD. Windows Media Player allows you to rip files from CD and save them in a variety of formats.
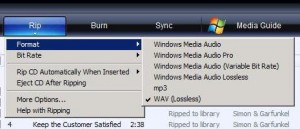
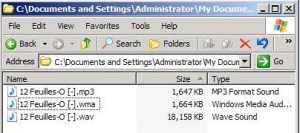
The most commonly used formats are MP3 and WAV. The WAV format is uncompressed so it provides the highest fidelity to the original music. But WAV files can be megabytes large. An MP3 file is up to 10 times smaller than a WAV file but loses some fidelity due to compression. Many users save WAV files for use on their local computers and make MP3 files when they plan to transfer files over the Internet.
Insert an Audio CD in your drive and open Windows Media Player.
Check the boxes next to the songs you want to rip.
Click “Rip” on the dropdown menu to start the ripping process.
To give you an idea of the file sizes generated by MP3, WMA, and WAV formats, here is the same song in each of those formats:
“Rip CD Automatically” starts ripping as soon as a CD is inserted unless you have selected “Never” or “Only When in the Rip Tab” on the submenu under this option. It can be useful if you are ripping several CDs in a row using the same format and bit rate settings.
The “Other Options” include setting the folder in which ripped music will be stored. By default, it is C:\My Documents\My Music.
Ripping CDs allows you to enjoy music on your computer or personal music files player. It’s a great way to preserve your CD from damage, too.
David Hakala has perpetrated technology tutorials since 1988 in addition to committing tech journalism, documentation, Web sites, marketing collateral, and profitable prose in general. His complete rap sheet can be seen at http://www.linkedin.com/in/dhakala

