by David Hakala
Sometimes it is desirable to change the size of a drive partition. Perhaps you underestimated the amount of space that a partition needed, or you want to shrink a partition to make room for another one.
Windows XP lets you create new partitions using any unallocated space on a drive. But changing the size of existing partitions is a pain. You have to back up all your data and programs; boot from a DOS CD (or floppy, if you still have one of those); use the FDISK utility to change existing partitions; reformat the partitions; and reinstall all that data. There has to be a better way!
Third-party software such as Symantec’s Norton PartitionMagic, which costs $69.95, lets you change existing partitions and create new ones under XP and older versions of Windows. But a new feature in Windows Vista makes repartitioning a drive easy and “free.”
To access Vista’s Disk Management console tool, either right-click on My Computer and select the Manage command from the context menu, or open the Run dialog box and enter the command Diskmgmt.msc. If you have User Access Control enabled, you will have to respond to that dialogue.
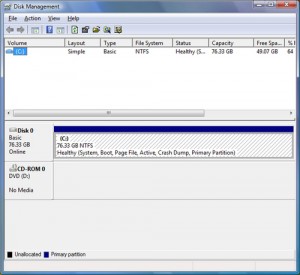
If you use the Manage command, you will see the Computer Management console tool and will need to click on Storage, then Disk Management. If you use the Run dialogue box you will be taken directly to the Disk Management console tool shown below. The dark blue bar in the figure is the allocated space of a disk partition.
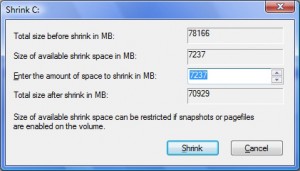
Enter the amount of space that you want to make available on the second partition, up to the maximum available shrink space. When you click the Shrink button, Disk Management will get busy for quite a while. Go make coffee.
When the new partition is created, you will have to make it usable. Right-click on the new partition and select “New Simple Volume.” Follow the instructions in the ensuing wizard to allocate all or part of the volume’s space to a drive letter and format the new drive.
David Hakala has written technology tutorials since 1988, in addition to tech journalism, profitable content, documentation, and marketing collateral.


{ 2 comments }
Hi,
I have done the instructions listed above for shrinking my external USB hard drive.. The problem is after starting the process it seemed to be doing something so I left it alone for several hrs.. When I came back it was still doing something I tried doing something else on my computer but it was frozen… I had to restart and now my external drive is un-recognized by my system.. I even get an error msg stating: USB device not recognized… I have tried using some other data recovery software but non of which work because they don’t seem to find the external drive.. The drive isn’t even shown as a empty/usable partition in My Computer. Any help with this matter would be great.
You Simply burned up your external drive…….
Comments on this entry are closed.