by David Hakala
When you create a user account under Windows, the operating system sets up a number of different folders to contain data specific to that user. These folders are placed on the same drive with the Windows operating systems files by default. There are some good reasons to change the location of these user files to a drive other than the one which Windows resides.
First, it makes backup operations faster and more efficient. User data changes very frequently, while the operating system changes seldom. If you make backups daily, as you should, then your backup program must a) work to sort changed files from unchanged files before backing up only the changed files, or b) back up unchanged files unnecessarily. Either way, backups take longer and consume more system resources while they are running, slowing down other things you may be doing.
Second, file defragmentation is made more efficient by keeping user data and operating system files on separate drives. Your collection of user data files grows and shrinks constantly, while the operating system files collection remains stable. If these collections are on separate drives, you can defragment the user data without degrading the reading of operating system files. Defragmentation will finish sooner, too.
Third, in the event of a drive failure you will lose access to only one class of data, not both. If the Windows drive crashes, you can reformat it and re-install Windows without wiping out your user data. If the user data drive crashes, you don’t have to re-install Windows.
The My Documents folder contains most user-generated data such as documents, pictures, music, video, etc. We described how to move the My Documents folder in the Tiplet article, (How and Why to Move the My Documents Folder to Another Drive) There are other special folders containing configuration files and other user-specific data that can be moved, too.
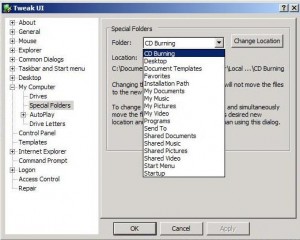
If you use Windows XP, first create a folder on the new drive to which you will move a special folder. Download Microsoft’s free Tweak UI utility. Install and launch the program. In TweakUI, click My Computer, then Special Folders in the menu tree on the left side. Select the folder that you want to move (such as Start Menu), click Change Location, browse to and select the new location, and read the warning. If you’re in the right place, click OK.
Now click Start, and choose your user account to open the folder containing its special folders. Open a second Explorer window, and select the folder to which you want to move your special folders. In your user-account folder, select the folders you want to move; use the right-mouse button to drag them out of that window and into the new folder in the other Explorer window, and click “Move Here.” Shortcuts to these folders will be in the same place when you open your user-account folder from the Start menu. But if you right-click a folder and choose Properties, the path shown will be the new location.
David Hakala has perpetrated technology tutorials since 1988 in addition to committing tech journalism, documentation, Web sites, marketing collateral, and profitable prose in general. His complete rap sheet can be seen at http://www.linkedin.com/in/dhakala
